|
|
 |
 |
|
OLBRICH
|
 |
 |
|
Impact Test - “Falling-weight Test"
The impact tester has gained wide acceptance in testing
the impact resistance of many types of coatings and substrates.
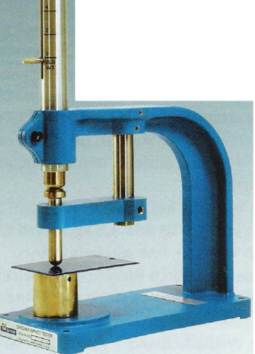
International standards describe a method for evaluating impact resistance of a coating to cracking and peeling from a substrate when it is subjected to adeformation caused by a falling weight, dropped under standard conditions yielding rapid deformation.
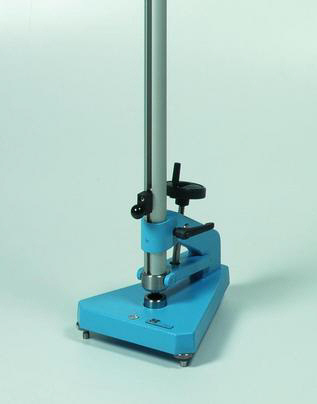
- Impact Tester
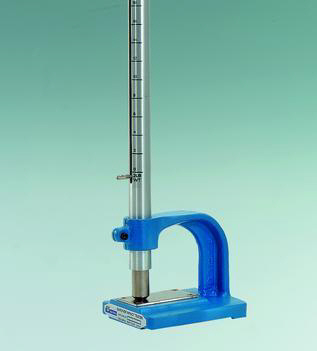
- Consists of a solid base with a guide tube support The guide tube has a slot to direct a weight that slides inside the guide tube
- A collar fits into the tube that helps slide the weight up and down
- Graduations are marked along the slot to facilitate readings
|
|
|
 |
 |
|
 |
|
 |
|
|
|
Cupping Test
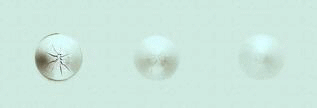
In addition to determining the deformability or elongation of a film, the cupping test method supplies information on adhesion properties. Single-Iayer systems can be tested as weil as multiple-Iayer systems.
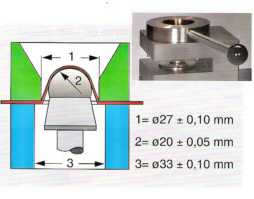
The ISO standards describe a method for evaluating the resistance of a coating to cracking and / or detachment from a metal substrate when it is subjected to a gradual deformation by indentation under standard conditions
|
|
 |
 |
|
 |
|
 |
|
|
|
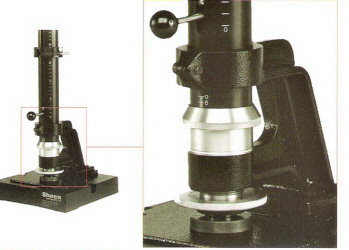
A die having a hardened and polished surface and a sampie holder with a retaining ring are the heart of a cupping tester. The indenter that contracts the test panel is of hardened polished steel and forms a hemisphere of 20 mm diameter. The maximum cupping depth is approx. 14 mm. The test process is observed through a microscope or magnifying glass.
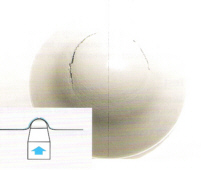
When evaluating the test results, it must be carefully assessed when the coating system starts cracking.
|
|
 |
|
|
 |
 |
 |
|
Light-Duty Impact Tester
Use with materials that can be damaged or penetrated by
small impact forces such as products mildly abused in households, offices or labs through years of normal use.
- 2 Ibs steel cylindrical impacter with 0.5 in (1.27 cm)diameter round-nosed end
- Tolerance of :!: 2 OZ; capa city 2 Ibs
- Graduated 16 inches (40.6 cm) guide tube
- Maximum force of 28 inch-pounds
- 0.563 in (1.43 cm) diameter hole in the base allows deformation of thin specimen panels
|
|
|
 |
|
|
|
Ordering Information
|
|
Technical Specifications
|
|
|
|
|
|
Ref No
|
Description
|
Scale
|
Weights included
|
Dimensions
|
Net Weight
|
Shipping Weight
|
|
1115
|
Light-Duty Impact Tester
|
English
|
0,9kg(2 lbs)
|
64x25x25cm
|
3,4kg
|
4,1kg
|
|
 |
 |
|
Comes complete with:
- Basic plate
- Guide tube with collar Scale in inch
- Weight(s)
- Impacter
- Operating instructions
|
 |
|
|
 |
 |
 |
 |
 |
|
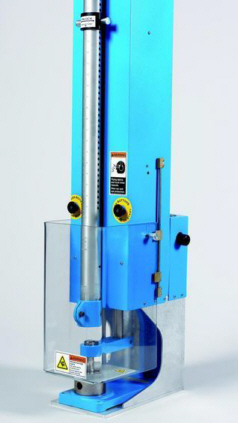
DIN EN ISO Impact Tester
Used for testing of coatings on metal substrates. In
accordance with DIN EN ISO standard, the test panel is fixed on the die using a clamping device, so that the panel surface outside the test area is not affected by the rapid deformation caused by the falling weight.
- Anodized guide tube with a scale in inches and mm . Tolerance for DIN EN ISO falling weights :t 1 9
- Maximum falling weight 2 kg
- Exchangeable falling weights and dies
- (an be easily converted for testing in accordance with ASTM
|
|
|
Impact Tester
The impact tester consists of a solid base stand with a
guide tube support. The guide tube has a slot that directs a cylindrical weight that is slided up and down with the use of a collar that fits into the weight. Graduations are marked along the slot to facilitate reading where the weight is dropped. The base of the instrument includes a die support. The weights have built-in steel balls that provide different geometrical configurations. It is important that the ball diameter fits into the die as to prevent shearing of the test sampies at the inner rim of the die. In order to limit the indentation depth of the falling weight, distance rings of different thickness can be fitted. Also, different weights can be used.
|
|
|
|
 |
|
|
|
Ordering Information
|
|
Technical Specifications
|
|
|
|
|
|
Ref No
|
Description
|
Scale
|
|
Dimensions
|
Weight Base Unit
|
Weight with Guide tube
|
|
5512
|
DIN EN ISO Impact Tester
|
Metric,English
|
|
127x25x25cm
|
16,8kg
|
19,5kg
|
|
 |
 |
 |
 |
|
Comes complete with:
- Basic plate with clamping device
- Guide tube with collar
- Scale in mm and inch
Note: Die and falling weight must be ordered separately
|
|
|
Accessories tor DIN EN ISO 6272 and DIN 55669 tor PF-5512
To follow this method, please order the falling weight and the die listed below. An additional weight can also be purchased.
|
|
 |
|
|
|
Ordering Information
|
|
Technical Specifications
|
|
Ref. No.
|
Description
|
|
|
5532
|
Falling Weight 1 kg
|
For Ball diameter 20 mm; With lifting pin; tor DIN
|
|
5525
|
Die
|
For Ref. No. 5532; For ball diameter 20 mm; Inner diameter 27 mm
|
|
5527
|
Additional Weight
|
For Ref. No. 5532; 1 kg; Attachable to talling weight
|
|
 |
 |
|
Accessories tor ASTM D 2794 for 5512
To follow this method, please order the falling weight and the die listed below. An additional weight can also be purchased.
|
 |
|
|
|
Ordering Information
|
Technical Specifications
|
|
Ref. No Description
|
|
|
5520 Falling Weight 2 Ibs
|
Ball diameter 12.7 mm (0.5 in); With lifting pin
|
|
5522 Falling Weight 2 Ibs
|
Ball diameter 15,9 mm (0.625 in); With lifting pin
|
|
5521 Die tor ball dia. 0.5 in
|
Inner diameter 0 17 mm (0.7 in); tor ball diameter 0.5 in
|
|
5528 Die tor ball dia. 0.5 in
|
Inner diameter 0 13.9 mm (0.55 in); tor ball diameter 0.5 in
|
|
5523 Die tor ball dia. 0.625 in
|
Inner diameter 0 21,2 mm (0.63 in); tor ball diameter 0.625 in
|
|
5529 Die tor ball dia. 0.625 in
|
Inner diameter 0 16.3 mm (0.63 in); tor ball diameter 0.625 in
|
|
5526 Additional Weight
|
For Ref. Nos. 5520 and 5522; 2 Ibs; Attachable to talling weight
|
|
 |
|
|
|
Ordering Information
|
Accessories
|
|
Ref No Description
|
|
|
5533 Set ot Distance Rings
|
Use to limit the indentation depth ot the talling weight trom 2 mm to 10 mm
|
|
 |
|
|
 |
 |
 |
|
Impact Tester Automatie Lift System
This pneumatically powered system has been added to the standard manual Gardner impact tester to relieve the operator of repetitive lifting of the drop weight and improve the repeatability of the test. The operator simply moves a small ring to a pre-established position on the test tube for selecting the desired drop height. A push of a button then initiates the system to automatically lift the weight to the exact selected position for sampie removal and new sampie placement.
This system is especially helpful where the large 8 and 16 pound weights are used By using a mechanical stop, the test is made more repeatable by eliminating any variation in the drop point by individuals releasing the weight by eye.
- This one button operation relieves operators from anyarm or finger stress or fatigue caused by repetitive manual testing
- Reduced chances for human error enhances testrepeatability during test audits
- This pneumatic system uses available plantcompressed air and needs no electricity - apower failure will not cause the system to stop functioning
- Pre-established positions on test tube at half inch intervals eliminate any human error in setting the drop height
- A special alignment tool comes with the system to assure that the weight always hits the sampie at the correct position
- Automation allows more tests to be run in a given amount of time than with a manual impact tester
- Special built-in safety features preclude premature weight drop if air pressure is lost
- Optional 4 Ib and 16 Ib weight kits - user installable
|
|
|
 |
|
|
|
Ordering Information
|
|
Technical Specifications
|
|
|
|
|
Ref No
|
Description
|
Scale
|
Weight included
|
Dimensions
|
Weight
|
|
5547
|
Automatic Lift Impact Tester
|
Metric,
|
3,6 kg
|
165x30x18cm
|
24 kg
|
|
 |
 |
|
Comes complete with:
- Standard Cat. No. 5546 SPI Modified Impact Tester Pneumatically powered lift mechanism
- (min. 50 PSI of clean dry air)
- System alignment tool
- Instruction manual
|
 |
|
|
|
Accessories
|
|
|
Ref No
|
Description
|
|
5548
|
4 Ib weight kit
|
|
5549
|
16 Ib weight kit
|
|
 |
 |
|
Comes complete with:
- Tube, weight, lift pen, stop position er
|
 |
 |
|
Tubular Impact Tester
The falling weight method provides reliable evaluation of the coatings resistance to impact.
A mass (with or without indenter, depending on standards) guided by a graduated tube, falls from variable heights up to 1 m onto the sam pie panel firmly clamped onto a die. The pass/fail height or force to failure can be determined on the tube scale. 3 versions are available, according to various standards.
Features
- Sturdy construction & heavy duty frame/base
- Easy clamping & depth adjustment (OIN EN ISO)
|
|
|
 |
 |
|
Ordering references*
Tubular Impact Tester
806/25 Tubular Impact Tester, ASTM 02794, 25":
- falling weight 2 Ibs. (8.9 N), height 25" (63.6 cm), 0 indenter 0.625" (15.9 mm), die 0.640" (16.3 mm) with weight locking collar
806/40 Tubular Impact Tester, ASTM 02794/ BS 6496,
- 40":falling weight 4 Ibs.(17.8 N), height 40" (101.7 cm), 0 indenter 0.625" (15.9 mm), die 0.640" (16.3 mm) with weight locking collar
807 Tubular Impact Tester, BS 3900 E13 / OIN
- 55669/ OIN EN ISO 6272: falling mass 1 kg, height 1 m, 0 indenter 20 mm / die 27 mm, fitted with depth adjustment ring and height adjustable weight locking collar (11 mm increment)
. Other " indenters, dies & weights available upon request
Standards
- ASTM 02794
- DIN EN ISO 6272
|
 |
 |
|
Please contact our Webmaster with questions or comments. ©Copyright 2008 herbros -olbrich know how -All rights reserved
|
|

